


后端框架搭建
全局统一响应
设计意义
统一的响应格式,方便前后端进行交互。前端可以在响应拦截时,统一根据异常码进行逻辑处理。
设计思路
首先需要确定响应Json格式,响应格式如下:
字段方面:
1、code码方便代码进行判断。数据类型String
2、msg用于前端页面展示信息。数据类String
3、data是返回的数据。数据类Object
其中code的数据类型为什么选String而不Integer 呢?主要是考虑代码规范,后续不同模块要设计错误码格式进行区分。例如,规定错误码统一为6位,1-2位代表服务,3-4位代表服务内的模块,5-6位用于模块内错误枚举序号。此时为了落地这种错误码设计,就可能会遇到:服务编号位0开头,整体错误码位数超出Integer范围,等情况。所以采String 类型比较好落地,避免不必要的麻烦。
{
  code: "200",
  msg: "请求成功",
  data: {}
}
其次需要了解如何实现全局响应:
首先是正常情况响应,通常是由Controller层代码手动返回数据的。对于这类情况,需要方便快速的对原始数据格式进行封装,然后返回。根据此思路,代码实现上,data字段采用泛型,提供静态方法快速构造通用响应。其中成功的情况分为,有数据成功和无数据成功。
@Data
public class Response<T> {

    private String code;

    private String msg;

    private T data;

    public static <T> Response<T> success() {
        return Response.success(null);
    }

    public static <T> Response<T> success(T data) {
        return Response.error(GlobalExceptionCode.SUCCESS, data);
    }

    public static <T> Response<T> error(ExceptionCode exceptionCode) {
        return Response.error(exceptionCode, null);
    }

    public static <T> Response<T> error(ExceptionCode exceptionCode, T data) {
        Response<T> result = new Response<>();
        result.code = exceptionCode.getCode();
        result.msg = exceptionCode.getMsg();
        result.data = data;
        return result;
    }

}
其次是异常情况响应,异常响应可以分两种,一种是代码逻辑进行的业务校验异常,一种是没有预料到的bug引发的代码异常。第一种情况通常不会去return异常,而是采用throw异常的方式进行抛出。第二种情况系统会自动throw抛出异常。所以需要进行全局的异常拦截,拦截到以后返回统一的响应格式。
全局异常处理
设计意义
避免异常信息直接返回给用户,体验不好,容易引发安全问题。
设计思路
1、设计异常框架体系。
首先是异常码,异常码必须包括code和msg,分别对应统一响应的code和msg。其次需要方便后续业务扩展。所以代码层面上采接口的方式去定义这个异常码。
public interface ExceptionCode {

    /**
     * 获取错误码
     *
     * @return 错误码
     */
    String getCode();

    /**
     * 获取错误信息
     *
     * @return 错误信息
     */
    String getMsg();

}后续每个业务模块实现此接口,扩展自己的异常码,为了方便,采枚举类型实现接口。
@Getter
@AllArgsConstructor
public enum GlobalExceptionCode implements ExceptionCode {

    SUCCESS("200", "请求成功"),
    UNKNOWN_ERROR("500", "未知错误");

    /**
     * 错误码
     */
    private final String code;

    /**
     * 错误信息
     */
    private final String msg;

}区分业务异常,和代码bug引发的异常,统一定义业务异常类,通过传入异常码进行构造。考虑后续一定会有异常信息,例用户名张三不存在这种需要采字符串模板结业务数据的提示,细节上采可变数组结匿名内部类的方式重getMsg方法,方便后续使用。
@Getter
public class BusinessException extends RuntimeException {

    private final ExceptionCode exceptionCode;

    public BusinessException(ExceptionCode exceptionCode, Object... args) {
        this.exceptionCode = new ExceptionCode() {
            @Override
            public String getCode() {
                return exceptionCode.getCode();
            }

            @Override
            public String getMsg() {
                return String.format(exceptionCode.getMsg(), args);
            }
        };
    }

}
2、全局异常拦截
首先需要了解Spring MVC流程架构,清楚异常拦截RestControllerAdvice的作用时机和范围。需要注意的是拦截器并不能拦截Filter中出现的异常,所以在拦截器中定义了一异常处理统一入口,供这类无法拦截到的地方调用。
@Slf4j
@RestControllerAdvice
public class GlobalExceptionHandler {

    /**
     * 用于处理全局异常拦截无法捕获到的位置
     *
     * @param ex      异常
     * @param request 请求信息
     * @return 通用返回
     */
    public Response<?> handle(Throwable ex, HttpServletRequest request) {
        if (ex instanceof BusinessException) {
            return businessExceptionHandler((BusinessException) ex, request);
        } else {
            return unknownExceptionHandler(ex, request);
        }
    }

    /**
     * 业务异常
     */
    @ExceptionHandler(BusinessException.class)
    public Response<?> businessExceptionHandler(BusinessException ex, HttpServletRequest request) {
        log.info("[businessExceptionHandler]: {}-{}", ex.getExceptionCode().getCode(), ex.getExceptionCode().getMsg());
        return Response.error(ex.getExceptionCode());
    }

    /**
     * 兜底处理
     */
    @ExceptionHandler(Throwable.class)
    public Response<?> unknownExceptionHandler(Throwable ex, HttpServletRequest request) {
        log.error("[unknownExceptionHandler]", ex);
        return Response.error(GlobalExceptionCode.UNKNOWN_ERROR);
    }

}细节方面,业务异常都是代码中判断后抛出的业务校验信息,信息中会展示详细业务情况,通常不需要进行排查错误,所以采info日志级别。而兜底处理的情况,大多都是代码bug,所以需error级别方便后续服务器日志排查。
全局链路ID
设计意义
方面排查用户请求日志,尤其是分布式场景,需要在海量的日志中精准定位某一次请求的全部链路。
设计思路
如果请求头中有traceId,则继续采用。如果没有,需要新生成一个。如何记录全局链路ID,这里需要用到ThreadLocal,把请求信息放在ThreadLocal中。这里采用TTL方案,实现threadlocal线程传递。
public class ReqInfoContextHolder {

    /**
     * 跨线程传递ThreadLocal,详见 TL,ITL,TTL 区别
     */
    private static final ThreadLocal<ReqInfo> CONTEXT = new TransmittableThreadLocal<>();

    /**
     * 创建空的请求上下文信息
     */
    public static ReqInfo createEmptyContext() {
        ReqInfo reqInfo = new ReqInfo();
        CONTEXT.set(reqInfo);
        return reqInfo;
    }

    /**
     * 获取当前线程的请求上下文信息,若不存在则自动创建一个新的
     */
    public static ReqInfo getReqInfo() {
        ReqInfo reqInfo = CONTEXT.get();
        if (reqInfo == null) {
            reqInfo = new ReqInfo();
            CONTEXT.set(reqInfo);
        }
        return reqInfo;
    }

    /**
     * 清除当前线程的请求上下文,防止内存泄漏
     */
    public static void clear() {
        CONTEXT.remove();
    }

}在最早的Filter中,生成并记录请求的traceId,记录请求信息上下文和日志MDC上下文中。需要注意结束finally清除上下文内容,避免内存泄漏。filter需要手动调用全局异常拦截器处理异常哈~
@Order(Integer.MIN_VALUE)
@Component
public class ReqInfoFilter extends OncePerRequestFilter {

    @Resource
    private GlobalExceptionHandler globalExceptionHandler;

    @Override
    protected void doFilterInternal(HttpServletRequest request, HttpServletResponse response, FilterChain filterChain) throws ServletException, IOException {
        try {
            // 创建新的请求上下文信息
            ReqInfo reqInfo = ReqInfoContextHolder.createEmptyContext();

            // 优先从请求头获取traceId,没有再随机生成
            String traceId = request.getHeader("traceId");
            traceId = StrUtil.isBlank(traceId) ? UUID.fastUUID().toString() : traceId;
            reqInfo.setTraceId(traceId);

            // 日志记录traceId
            MDC.put("traceId", traceId);

            // 放行
            filterChain.doFilter(request, response);

        } catch (Throwable ex) {
            // 处理异常,写入响应
            Response<?> errorResponse = globalExceptionHandler.handle(ex, request);
            ServletUtils.writeJson(response, errorResponse);
        } finally {
            // 清理请求上下文信息,日志上下文信息
            ReqInfoContextHolder.clear();
            MDC.clear();
        }
    }

}
日志打印出链路ID,需要配置logback日志格式,同时配一下日志路径,滚动策略,异步记录之类的。
<configuration scan="true" scanPeriod="30 seconds">

    <!-- 定义属性 -->
    <property name="LOG_DIR" value="${LOG_PATH:-./logs}" />

    <!-- 控制台输出 -->
    <appender name="CONSOLE" class="ch.qos.logback.core.ConsoleAppender">
        <encoder>
            <charset>UTF-8</charset>
            <pattern>%red(%d{yyyy-MM-dd HH:mm:ss}) %cyan([%X{traceId}]) %green([%thread]) %highlight(%-5level) %boldMagenta(%logger) - %black(%msg%n)</pattern>
        </encoder>
    </appender>

    <!-- 输出所有级别的日志 -->
    <appender name="FILE_ALL" class="ch.qos.logback.core.rolling.RollingFileAppender">
        <file>${LOG_DIR}/application-all.log</file>
        <rollingPolicy class="ch.qos.logback.core.rolling.SizeAndTimeBasedRollingPolicy">
            <!-- 日志文件名格式 -->
            <fileNamePattern>${LOG_DIR}/application-all-%d{yyyy-MM-dd}.%i.log</fileNamePattern>
            <!-- 最大单个文件大小 -->
            <maxFileSize>10MB</maxFileSize>
            <!-- 最多保留 30 天的日志文件 -->
            <maxHistory>30</maxHistory>
            <!-- 总共最多保留 1GB 的日志文件 -->
            <totalSizeCap>1GB</totalSizeCap>
        </rollingPolicy>
        <encoder>
            <charset>UTF-8</charset>
            <pattern>%red(%d{yyyy-MM-dd HH:mm:ss}) %cyan([%X{traceId}]) %green([%thread]) %highlight(%-5level) %boldMagenta(%logger) - %black(%msg%n)</pattern>
        </encoder>
    </appender>

    <!-- 输出 ERROR 级别及以上的日志 -->
    <appender name="FILE_ERROR" class="ch.qos.logback.core.rolling.RollingFileAppender">
        <file>${LOG_DIR}/application-error.log</file>
        <rollingPolicy class="ch.qos.logback.core.rolling.SizeAndTimeBasedRollingPolicy">
            <!-- 日志文件名格式 -->
            <fileNamePattern>${LOG_DIR}/application-error-%d{yyyy-MM-dd}.%i.log</fileNamePattern>
            <!-- 最大单个文件大小 -->
            <maxFileSize>10MB</maxFileSize>
            <!-- 最多保留 30 天的日志文件 -->
            <maxHistory>30</maxHistory>
            <!-- 总共最多保留 1GB 的日志文件 -->
            <totalSizeCap>1GB</totalSizeCap>
        </rollingPolicy>
        <encoder>
            <charset>UTF-8</charset>
            <pattern>%red(%d{yyyy-MM-dd HH:mm:ss}) %cyan([%X{traceId}]) %green([%thread]) %highlight(%-5level) %boldMagenta(%logger) - %black(%msg%n)</pattern>
        </encoder>
        <filter class="ch.qos.logback.classic.filter.ThresholdFilter">
            <level>ERROR</level>
        </filter>
    </appender>

    <!-- 异步日志记录 -->
    <appender name="ASYNC_FILE_ALL" class="ch.qos.logback.classic.AsyncAppender">
        <appender-ref ref="FILE_ALL"/>
        <queueSize>256</queueSize>
        <discardingThreshold>0</discardingThreshold>
    </appender>

    <appender name="ASYNC_FILE_ERROR" class="ch.qos.logback.classic.AsyncAppender">
        <appender-ref ref="FILE_ERROR"/>
        <queueSize>256</queueSize>
        <discardingThreshold>0</discardingThreshold>
    </appender>

    <!-- 根 logger 配置 -->
    <root level="INFO">
        <appender-ref ref="CONSOLE"/>
        <appender-ref ref="ASYNC_FILE_ALL"/>
        <appender-ref ref="ASYNC_FILE_ERROR"/>
    </root>

    <!-- 特定包的日志级别配置 -->
    <logger name="com.yourcompany" level="DEBUG" additivity="false">
        <appender-ref ref="CONSOLE" />
        <appender-ref ref="ASYNC_FILE_ALL" />
        <appender-ref ref="ASYNC_FILE_ERROR" />
    </logger>

</configuration>
可以看到,请求进入后,日志中带有统一traceId。
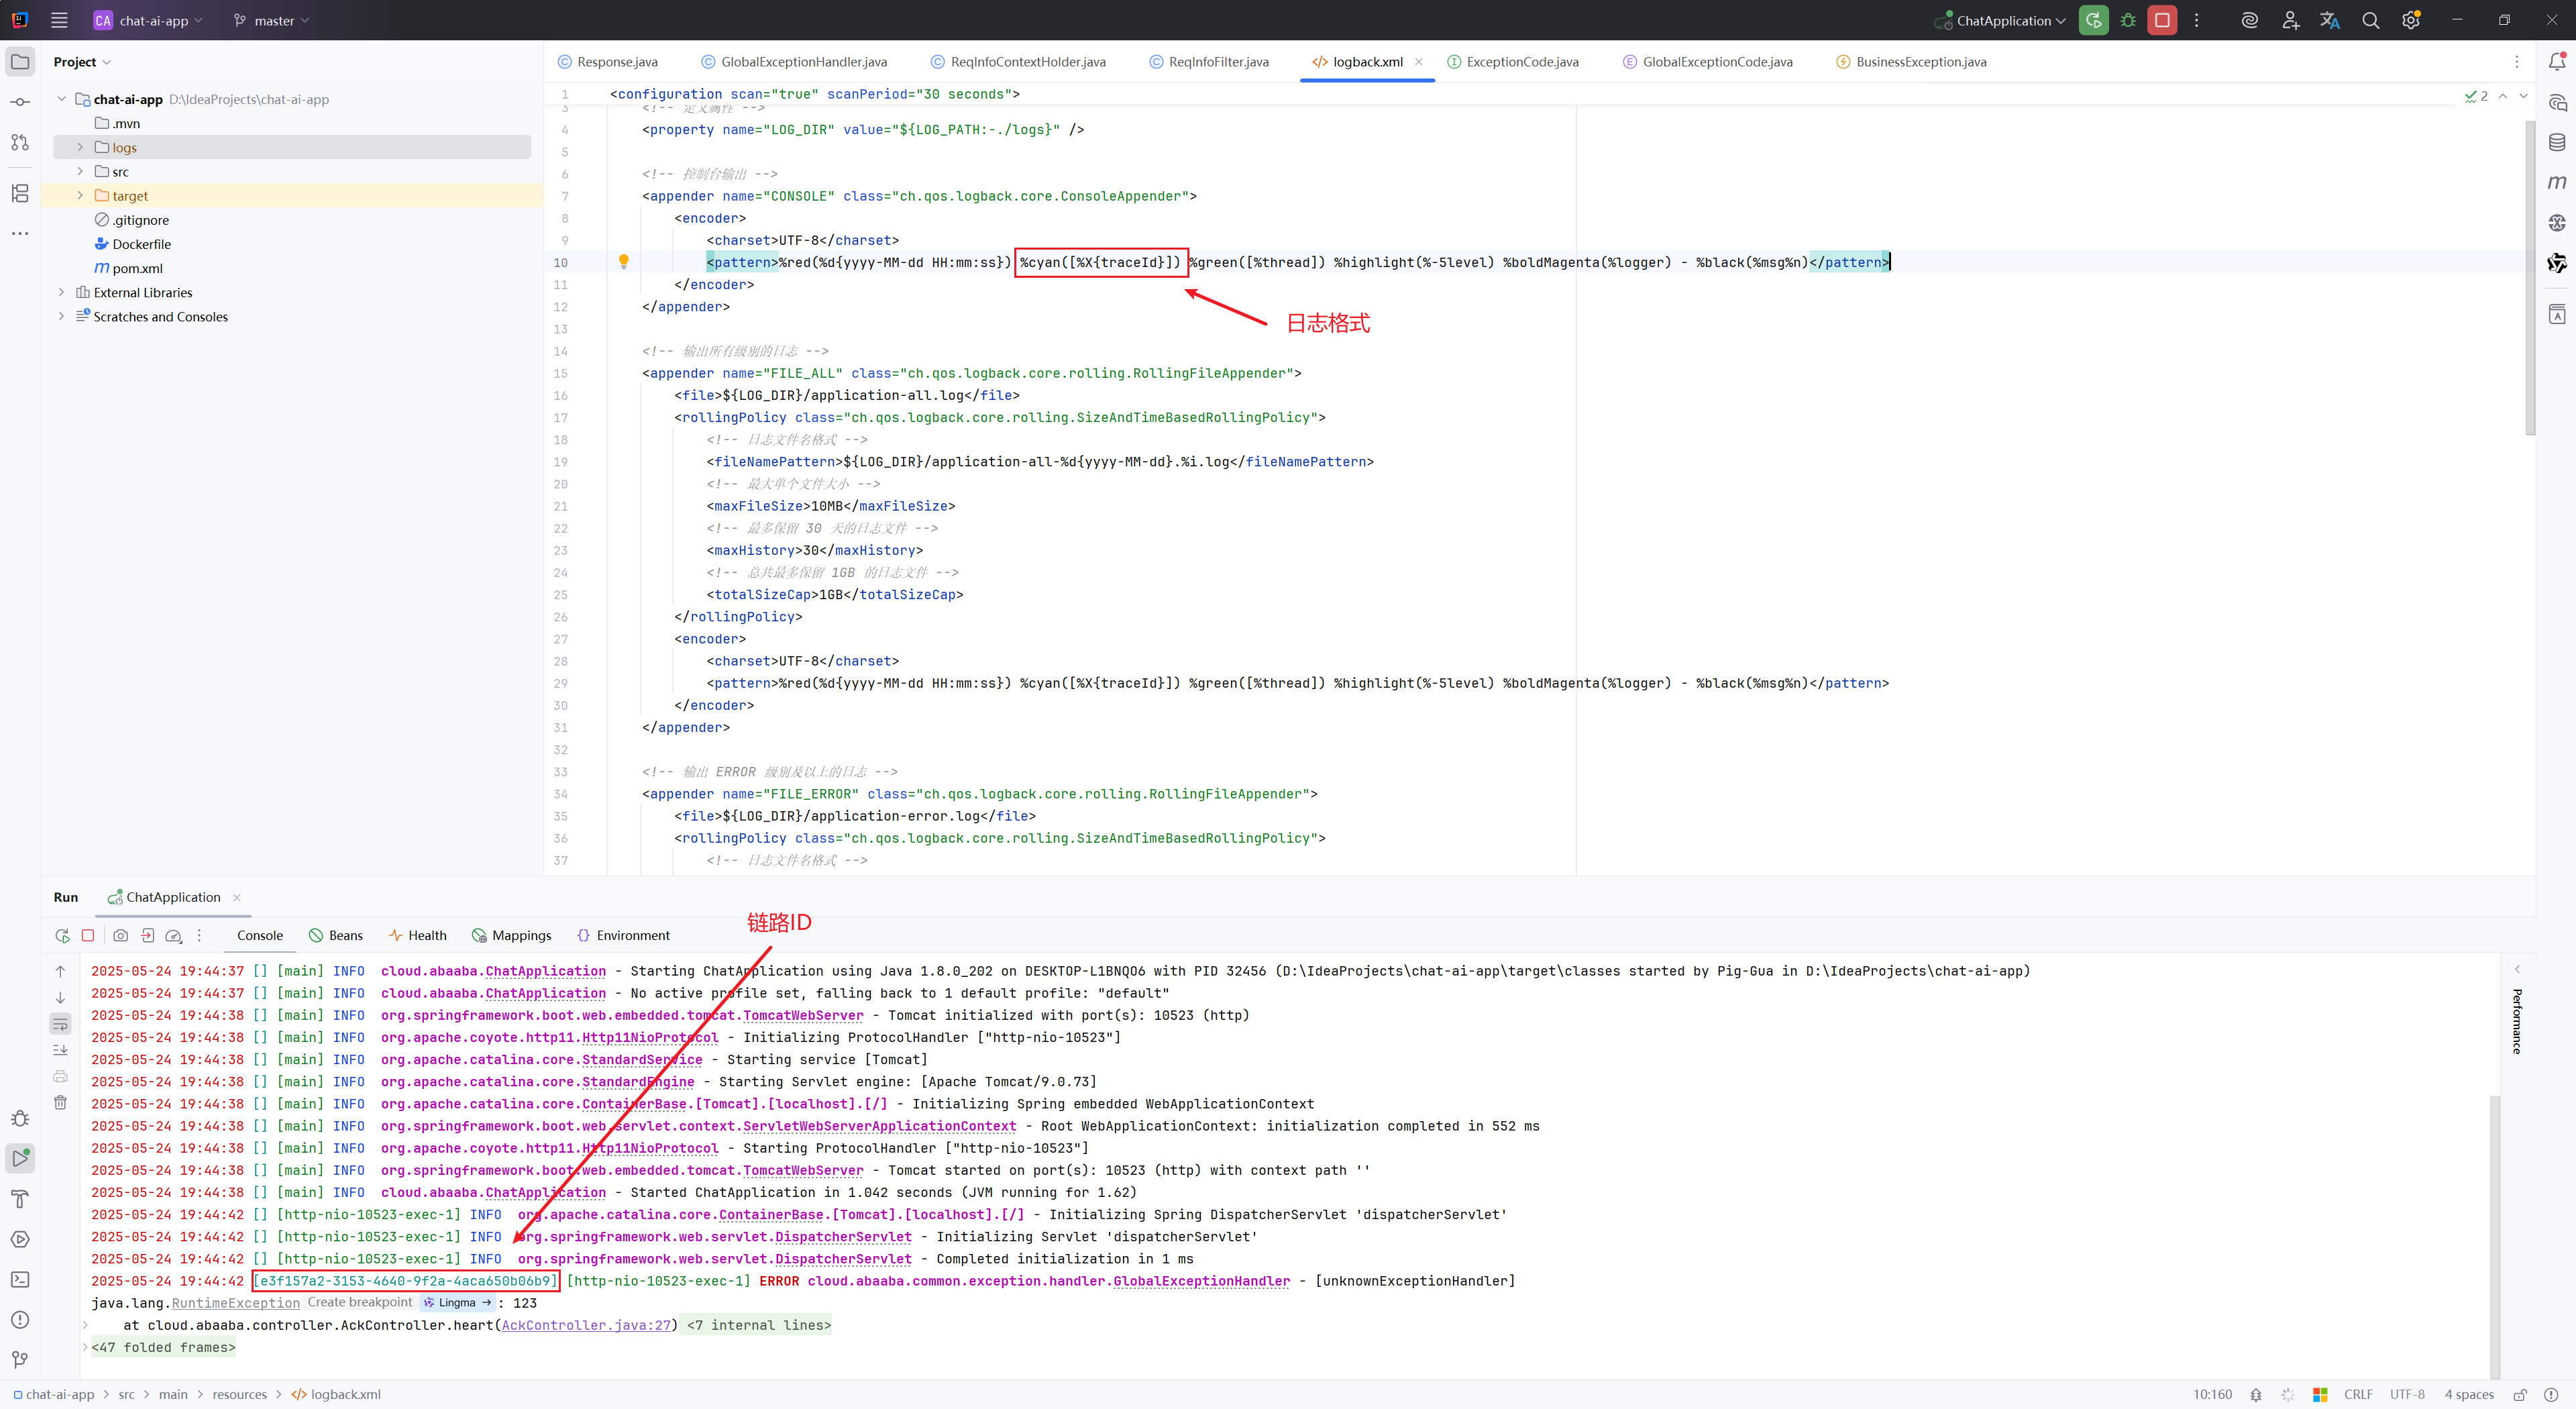
后续服务器排查错误,可以先查找error日志的traceId,然后定位该请求的全部日志。
c
cat application-all.log | grep e3f157a2-3153-4640-9f2a-4aca650b06b9前端框架搭建
Meesage(antd)全局调用封装
设计意义
通过查阅antd官方文档发现,Message组件推荐通过顶层注册的方式代替 message 静态方法,因为静态方法无法消费上下文,因而 ConfigProvider 的数据也不会生效。
设计思路
依据Message的Hooks使用方const [messageApi, contextHolder] = message.useMessage(); 其中api用于发起弹窗,context用于指定上下文。所以在全局调用message时,需要一个单例,需要导出api供全局调用,需要context在顶层注册。
1、构建message单例
import type {MessageInstance} from "antd/es/message/interface";

let message: MessageInstance | null = null;

export const setGlobalMesssage = (instance: MessageInstance) => {
    message = instance;
}

export const getGlobalMessage = () => {
    if (!message) {
        throw new Error("message is not initialized")
    }
    return message;
}
2、顶层注册+单例初始化
const [messageApi, contextHolder] = message.useMessage();

useEffect(() => {
    setGlobalMesssage(messageApi)
}, [messageApi])

return <>{contextHolder}</>
3、全局调用
getGlobalMessage().error({
  content: '错误信息'
})
axios请求封装
设计意义
发请求时需要处理token,收响应时需要处理错误码,所以需要做统一的请求响应拦截,减少重复代码逻辑,方便后续维护。
设计思路
需要对axios进行二次封装,现有的封装方式网上写的非常好的很多,这里做了些整合。
1、类型定义
import type {
    Method,
    AxiosError,
    AxiosResponse,
    AxiosRequestConfig
} from "axios";

/** 请求类型 */
export type RequestMethods = Extract<
    Method,
    "get" | "post" | "put" | "delete" | "patch" | "option" | "head"
>;

/** 错误类型 */
export interface HttpError extends AxiosError {
    isCancelRequest?: boolean;
}

/** 响应类型 */
export interface HttpResponse extends AxiosResponse {
    config: PureHttpRequestConfig;
}

/** 请求配置类型 */
export interface HttpRequestConfig extends AxiosRequestConfig {
    beforeRequestCallback?: (request: PureHttpRequestConfig) => void;
    beforeResponseCallback?: (response: PureHttpResponse) => void;
}

/** 统一响应类型 */
export interface Response<T> {
    code: string;
    msg: string;
    data: T;
}

/** 导出 Http 请求方法 */
export default class Http {
    request<T>(
        method: RequestMethods,
        url: string,
        param?: AxiosRequestConfig,
        axiosConfig?: PureHttpRequestConfig
    ): Promise<T>;

    post<T, P>(
        url: string,
        params?: P,
        config?: PureHttpRequestConfig
    ): Promise<T>;

    get<T, P>(
        url: string,
        params?: P,
        config?: PureHttpRequestConfig
    ): Promise<T>;
}
2、axios实例封装:目前阶段还没有引入token相关逻辑,后续逻辑重点在请求拦截和响应拦截
import Axios, {
    type AxiosInstance,
    type AxiosRequestConfig, type AxiosResponse,
    type CustomParamsSerializer
} from "axios";
import type {
    HttpError,
    RequestMethods,
    HttpResponse,
    HttpRequestConfig, Response
} from './type';
import {stringify} from "qs";
import NProgress from "../progress";
import {getGlobalMessage} from "../message";

// 相关配置请参考:www.axios-js.com/zh-cn/docs/#axios-request-config-1
const defaultConfig: AxiosRequestConfig = {
    baseURL: import.meta.env.VITE_API_BASE_URL || '/api',
    // 请求超时时间
    timeout: 10000,
    headers: {
        Accept: "application/json, text/plain, */*",
        "Content-Type": "application/json",
        "X-Requested-With": "XMLHttpRequest"
    },
    // 数组格式参数序列化(https://github.com/axios/axios/issues/5142)
    paramsSerializer: {
        serialize: stringify as unknown as CustomParamsSerializer
    }
};

class Http {
    constructor() {
        this.httpInterceptorsRequest();
        this.httpInterceptorsResponse();
    }

    /** 初始化配置对象 */
    private static initConfig: HttpRequestConfig = {};

    /** 保存当前`Axios`实例对象 */
    private static axiosInstance: AxiosInstance = Axios.create(defaultConfig);

    /** 请求拦截 */
    private httpInterceptorsRequest(): void {
        Http.axiosInstance.interceptors.request.use(
            // eslint-disable-next-line @typescript-eslint/no-explicit-any
            async (config: HttpRequestConfig): Promise<any> => {
                // 开启进度条动画
                NProgress.start();
                // 优先判断post/get等方法是否传入回调,否则执行初始化设置等回调
                if (typeof config.beforeRequestCallback === "function") {
                    config.beforeRequestCallback(config);
                    return config;
                }
                if (Http.initConfig.beforeRequestCallback) {
                    Http.initConfig.beforeRequestCallback(config);
                    return config;
                }
                /** 请求白名单,放置一些不需要`token`的接口(通过设置请求白名单,防止`token`过期后再请求造成的死循环问题) */
                const whiteList = ["/refresh-token", "/login"];
                return whiteList.some(url => config.url?.endsWith(url))
                    ? config
                    : new Promise(resolve => {
                        config.headers = config.headers ? config.headers : {};
                        config.headers["Authorization"] = "123456";
                        resolve(config);
                    });
            },
            error => {
                return Promise.reject(error);
            }
        );
    }

    /** 响应拦截 */
    private httpInterceptorsResponse(): void {
        const instance = Http.axiosInstance;
        instance.interceptors.response.use(
            (response: HttpResponse) => {
                const $config = response.config;
                // 关闭进度条动画
                NProgress.done();
                // 业务逻辑错误统一处理
                const {data} = response;
                if (data.code !== "200") {
                    getGlobalMessage().error(data.msg)
                    return Promise.reject(data);
                }
                // 优先判断post/get等方法是否传入回调,否则执行初始化设置等回调
                if (typeof $config.beforeResponseCallback === "function") {
                    $config.beforeResponseCallback(response);
                    return response as AxiosResponse;
                }
                if (Http.initConfig.beforeResponseCallback) {
                    Http.initConfig.beforeResponseCallback(response);
                    return response as AxiosResponse;
                }
                return response as AxiosResponse;
            },
            (error: HttpError) => {
                const $error = error;
                $error.isCancelRequest = Axios.isCancel($error);
                // 关闭进度条动画
                NProgress.done();
                // 所有的响应异常 区分来源为取消请求/非取消请求
                return Promise.reject($error);
            }
        );
    }

    /** 通用请求工具函数 */
    public request<T>(
        method: RequestMethods,
        url: string,
        param?: AxiosRequestConfig,
        axiosConfig?: HttpRequestConfig
    ): Promise<Response<T>> {
        const config = {
            method,
            url,
            ...param,
            ...axiosConfig
        } as HttpRequestConfig;

        // 单独处理自定义请求/响应回调
        return new Promise((resolve, reject) => {
            Http.axiosInstance
                .request(config)
                .then((response: AxiosResponse<Response<T>>) => {
                    resolve(response.data);
                })
                .catch(error => {
                    reject(error);
                });
        });
    }

    /** 单独抽离的`post`工具函数 */
    public post<T, P>(
        url: string,
        params?: AxiosRequestConfig<P>,
        config?: HttpRequestConfig
    ): Promise<Response<T>> {
        return this.request<T>("post", url, params, config);
    }

    /** 单独抽离的`get`工具函数 */
    public get<T, P>(
        url: string,
        params?: AxiosRequestConfig<P>,
        config?: HttpRequestConfig
    ): Promise<Response<T>> {
        return this.request<T>("get", url, params, config);
    }
}

export const http = new Http();
核心技术点
1、如何设计全局统一响应
2、请求进入后端的mvc流程
3、全局异常拦截的作用时机
4、ThreadLocal的原理及使用
5、TL,ITL,TTL的原理及区别
6、如何实现多线程/线程池上下文传递
7、logbak日志配置
8、线上环境如何排查错误
评论区